Dense Arrays
In this tutorial we will learn how to create, read, and write a simple dense array in TileDB.
Program |
Links |
|
|


Basic concepts and definitions
Cell, Dimension, Domain
An array in TileDB is an n-dimensional collection of cells, where each cell is uniquely identified by a coordinate tuple equal to the dimensionality of the array. For example, every cell in a 2D array is represented by a coordinate pair
(i, j), whereas in a 3D array by a coordinate triple,(i, j, k). Each dimension in the array has an associated domain which defines the data type and extent(min, max)of coordinate values for that dimension. The dimension domain could be of typeint8,uint8,int16,uint16,int32,uint32,int64,uint64,float32, orfloat64. Notice that TileDB supports negative as well as real dimensions domains, but for now we will only focus on positive integer domains. The ordered set of dimensions comprise the array domain.Note
In TileDB, currently all dimension domains must have the same type.
Attribute
In TileDB, a cell is not limited to storing a single value. Each cell stores a tuple with a structure that is common to all cells. Each tuple element corresponds to a value on a named attribute of a certain type. The array cells can be perceived as rows in a table, where each column is an attribute and each row is uniquely identified by the cell coordinates. An attribute can specify a single value of type
char,int8,uint8,int16,uint16,int32,uint32,int64,uint64,float32, orfloat64, or a fixed- or variable-sized vector of the above primitive types.
Array schema
The structure of the array, i.e., the number of dimensions and type of their domains, the number and type of attributes (and a lot of other information covered in later tutorials) are all defined in the array schema. The array schema is very similar to a table schema used in Databases.
Dense array
If every cell in the array has an associated value, such as a pixel in a 2D image, we call the array dense.
Array directory
An array is stored on persistent storage as a directory containing subdirectories and files. We will explain in later tutorials the benefits from such a physical organization, and how a “directory” translates for storage backends where directories are not treated in the same manner as in a local POSIX filesystem (e.g., for the S3 object store).
Subarray
A subarray is a slice of the array domain, used in queries.
Creating a dense array
C++
The following snippet creates an empty array schema for a dense array:
Context ctx;
ArraySchema schema(ctx, TILEDB_DENSE);
Next, we define a 2D domain where the coordinates can be integer values from 1 to 4 (inclusive) along both dimensions. For now, you can ignore the last argument in the dimension constructor (tile extent).
Domain domain(ctx);
domain.add_dimension(Dimension::create<int>(ctx, "rows", {{1, 4}}, 4))
    .add_dimension(Dimension::create<int>(ctx, "cols", {{1, 4}}, 4));
Then, attach the domain to the schema, and configure a few other parameters (cell and tile ordering) that are explained in later tutorials:
schema.set_domain(domain).set_order({{TILEDB_ROW_MAJOR, TILEDB_ROW_MAJOR}});
Finally, create a single attribute named a for the array that will hold a single
integer for each cell:
schema.add_attribute(Attribute::create<int>(ctx, "a"));
Python
First we define a 2D domain where the coordinates can be integer values
from 1 to 4 (inclusive) along both dimensions. For now, you can ignore
the tile argument in the dimension constructor (tile extent).
# Don't forget to 'import numpy as np'
dom = tiledb.Domain(tiledb.Dim(name="rows", domain=(1, 4), tile=4, dtype=np.int32),
                    tiledb.Dim(name="cols", domain=(1, 4), tile=4, dtype=np.int32))
Next we create the schema object, attaching the domain and a single attribute a
that will hold a single integer for each cell:
schema = tiledb.ArraySchema(domain=dom, sparse=False,
                            attrs=[tiledb.Attr(name="a", dtype=np.int32)])
Note
The order of the dimensions (as added to the domain) is important later when
specifying subarrays. For instance, in the above schema, subarray
[1,2], [2,4] means slice the first two values in the rows dimension
domain, and values 2,3,4 in the cols dimension domain.
All that is left to do is create the empty array on disk so that it can be written to. We specify the name of the array to create, and the schema to use. This command will essentially persist the array schema we just created on disk.
C++
std::string array_name("quickstart_dense_array");
Array::create(array_name, schema);
Python
array_name = "quickstart_dense"
tiledb.DenseArray.create(array_name, schema)
Note
The array name here will be used to create a data directory in the
current working path (see On-disk Structure. below).
The array name can also be a full URI, for example a path like
file:///home/username/my_array or an S3 URI like
s3://bucket-name/array-name.
Writing to the array
We will populate the array with values 1, 2, ..., 16.
To start, prepare the data to be written:
C++
std::vector<int> data = {
    1, 2, 3, 4, 5, 6, 7, 8, 9, 10, 11, 12, 13, 14, 15, 16};
Python
data = np.array(([1, 2, 3, 4],
                 [5, 6, 7, 8],
                 [9, 10, 11, 12],
                 [13, 14, 15, 16]))
C++
Next, open the array for writing, and create a query object:
Context ctx;
Array array(ctx, array_name, TILEDB_WRITE);
Query query(ctx, array);
Then, set up the query. We set the buffer for attribute a, and also set the
layout of the cells in the buffer to row-major.
query.set_layout(TILEDB_ROW_MAJOR).set_buffer("a", data);
Finally, submit the query and close the array.
query.submit();
array.close();
Python
Next, open the array for writing and write the data to the array:
with tiledb.DenseArray(array_name, mode='w') as A:
    A[:] = data
By default, the Python API issues the write query in row-major layout.
Although the cell layout is covered thoroughly in later tutorials, here what
you should know is that you are telling TileDB that the cell values in your
buffer will be written in row-major order in the cells of the array (i.e.,
1 will be stored in cell (1,1), 2 in (1,2), etc.).
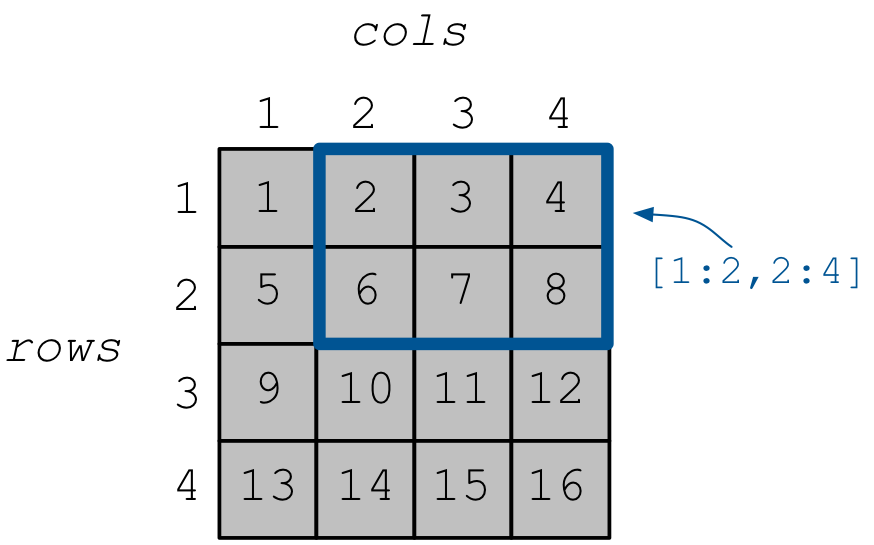
The array data is now stored on disk. The resulting array is depicted in the figure below.
Reading from the array
We will next explain how to read the cell values in subarray
[1,2], [2,4], i.e., in the blue rectangle shown in the figure above.
The result values should be 2 3 4 6 7 8, reading in
row-major order (i.e., first the three selected columns of row 1,
then the three selected columns of row 2).
C++
Reading happens in much the same way as writing, except we must provide buffers sufficient to hold the data being read. First, open the array for reading:
Context ctx;
Array array(ctx, array_name, TILEDB_READ);
Next, specify the subarray in terms of (min, max) values on each
dimension. Also define the buffer that will hold the result, making
sure that it has enough space (six elements here, as the result
of the subarray will be six integers). Proper result buffer allocation
is an important topic that is covered in detail in later tutorials.
const std::vector<int> subarray = {1, 2, 2, 4};
std::vector<int> data(6);
Then, we set up and submit a query object, and close the array, similarly to writes.
Query query(ctx, array);
query.set_subarray(subarray)
     .set_layout(TILEDB_ROW_MAJOR)
     .set_buffer("a", data);
query.submit();
array.close();
Python
Reading happens in much the same way as writing, simply specifying a different mode when opening the array:
with tiledb.DenseArray(array_name, mode='r') as A:
    # Slice only rows 1, 2 and cols 2, 3, 4.
    data = A[1:3, 2:5]
    print(data["a"])
Again by default the Python API issues the read query in row-major layout.
The row-major layout here means that the cells will be returned in row-major order
within the subarray [1,2], [2,4] (more information on cell layouts
is covered in later tutorials).
Now data holds the result cell values on attribute a.
If you compile and run the example of this tutorial as shown below, you should
see the following output:
C++
$ g++ -std=c++11 quickstart_dense.cc -o quickstart_dense -ltiledb
$ ./quickstart_dense
2 3 4 6 7 8
Python
$ python quickstart_dense.py
[[2 3 4]
 [6 7 8]]
On-disk structure
A TileDB array is stored on disk as a directory with the name given at the time of array creation. If we look into the array on disk after it has been written to, we will see something like the following
$ ls -l quickstart_dense_array/
total 8
drwx------  4 stavros  staff  128 Jun 25 15:18 __1561490302161_1561490302161_15bab0281e2e44f2a803eb6f3001ed00
-rwx------  1 stavros  staff  149 Jun 25 15:18 __array_schema.tdb
-rwx------  1 stavros  staff    0 Jun 25 15:18 __lock.tdb
The array directory and files __array_schema.tdb and __lock.tdb were written upon
array creation, whereas subdirectory
__1561490302161_1561490302161_15bab0281e2e44f2a803eb6f3001ed00 was
created after array writting. This subdirectory, called fragment, contains the written
cell values for attribute a in file a.tdb, along with associated metadata:
$ ls -l quickstart_dense_array/__1561490302161_1561490302161_15bab0281e2e44f2a803eb6f3001ed00/
total 16
-rwx------  1 stavros  staff  602 Jun 25 15:18 __fragment_metadata.tdb
-rwx------  1 stavros  staff   84 Jun 25 15:18 a.tdb
The TileDB array hierarchy on disk and more details about fragments are discussed in later tutorials.